
Cabinet Restoration How to Save Old Wood Kitchen Cabinets
A scratched door or a stiff hinge does not mean a kitchen has reached the end. Often the wood underneath is sound, and sometimes it is better than anything sold today. Smart cabinet restoration can bring back both the strength and the good looks. Below, we explain how to judge your cabinets, what the work involves, and when outside help makes sense.
Why Old Wood Cabinets Deserve a Second Look
Solid wood from earlier decades is dense and heavy. Many modern boxes, made from pressed chips, cannot match it. A few damp summers can leave those cheaper builds swollen or peeling.
Replacement also costs more than most owners expect. Demolition, new units, delivery and installation add up quickly. Restoring what already stands is usually kinder to the budget. There is a quieter gain too. Old cabinets already fit the room, so the layout stays as it is.
Here is what homeowners typically gain:
A lower cost than full replacement
Less waste sent to landfill
An original layout that still works
A shorter disruption to daily cooking
How to Tell If Your Cabinets Can Be Saved
Not every set deserves the effort. A short inspection tells us a lot.
Signs of a Good Candidate
Frames feel firm when pressed
Doors close without twisting
Damage is limited to wear, stains or tired paint
The material is solid wood or quality veneer
Signs That Call for Caution
Soft or crumbling panels near the sink
Mould that returns after cleaning
Boxes that have warped out of shape
Deep water damage across the base units
(A simple check: press a screwdriver tip gently into the wood under the sink. If it sinks in easily, the board is rotting.)
The Steps Behind Proper Kitchen Cabinet Restoration
Good results come from kitchen cabinet restoration. The final coat is only the last layer, not the main event.
1. Clean Away Grease
Cooking leaves an invisible film on wood. Doors above the stove collect the most. New finish will not grip that film, so a degreasing cleaner, a rinse and full drying time come first.
2. Remove Doors and Hardware
Label every door and hinge with masking tape. Keep screws in marked bags. This small habit saves an afternoon when everything has to line up again.
3. Repair the Damage
Fill dents and gouges with wood filler
Re-glue and clamp loose joints
Replace broken hinges or drawer slides
Sand each repair flush with the surface
4. Sand and Prime
Sanding gives the new finish something to hold. Heavy old varnish may need stripping first, and that part is slow. Primer then seals knots and blocks stains from bleeding through, which oak is known to do.
5. Apply the Final Finish
Thin coats beat one thick coat every time. Each layer needs its full drying period. Rushed work leaves drips and a tacky feel that can linger for weeks.
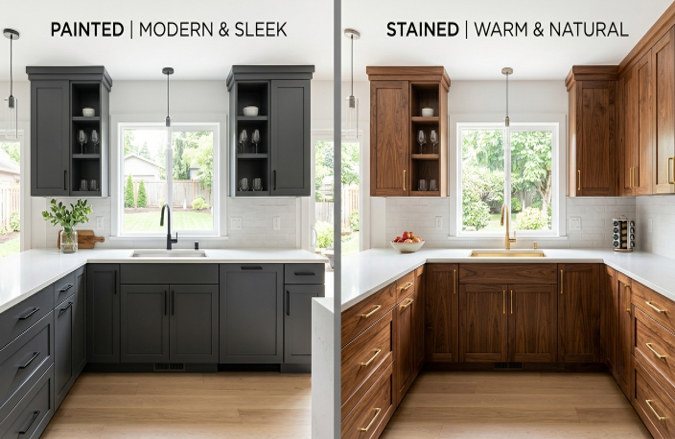
Paint, Stain or Refinish: Which Route Fits Your Kitchen?
The right choice depends on the wood and on the look you want.
Staining
Staining suits cabinets with attractive grain and a sound existing finish. It keeps the natural pattern visible. The trade-off is that color changes are limited to darker tones.
Painting
Paint hides tired grain and opens the door to nearly any color. White, soft grey and deep green remain popular. Open-grain oak can show texture through the paint unless a grain filler goes on first.
Full Cupboard Refinishing
Cupboard refinishing combines stripping, repair and a new finish in one plan. It works well for sets with mixed damage, such as chipped doors beside worn edges. Every surface receives the same treatment, so the result looks even from end to end.
Common Mistakes That Cut Results Short
Most disappointments trace back to a handful of errors.
Using wall paint instead of a hard-wearing cabinet coating
Working in humid weather, which slows drying
Forgetting the inside of drawers and the edges of doors
Choosing a color from a tiny sample card
Reinstalling doors before the finish has cured
Curing deserves its own note. A coat can feel dry within a day and still be soft for two weeks. Gentle use during that window protects the work.
Should We Do It Ourselves or Hire a Professional?
A single vanity suits a weekend project. A full kitchen is a different story. Twenty or more doors, drawer fronts, frames and toe kicks create a long list. Dust control and spray finishing also call for proper equipment.
These questions help with the decision:
Do we have a ventilated space to work in?
Can the kitchen stay out of use for several days?
Are repairs needed beyond simple filling?
Is a factory-smooth finish important to us?
If two or more answers lean toward no, a specialist saves time and prevents costly redoing.
Care Tips After Restoration
Daily habits decide how long a finish lasts.
Wipe spills quickly with a soft, damp cloth
Avoid abrasive pads and harsh cleaners
Use a mild soap solution for routine cleaning
Fit soft-close bumpers to reduce impact
Keep cabinet faces away from direct steam
Conclusion
Sturdy wood, a sensible plan and careful prep can turn worn cabinets into the best feature of a kitchen. The key is an honest inspection, patient preparation and a finish built for daily use.
For homeowners in Kitchener-Waterloo, Cambridge and Guelph, 180 Transformations offers cabinet refinishing and refacing for kitchens and bathrooms. A conversation with our team is a practical first step toward saving the cabinets you already own.
FAQs
How long does kitchen cabinet restoration take?
Most kitchens need five to ten working days, including drying time. Larger layouts or heavy repairs can extend that.
Is cabinet restoration cheaper than replacement?
Usually it is. Restoring existing boxes avoids demolition, new materials and installation charges. Exact savings depend on size and condition.
Can any wood cabinet go through cupboard refinishing?
Most solid wood and good veneer sets can. Severe rot, deep water damage or crumbling particle board may not respond well.
Which lasts longer, stain or paint?
Both can last for years with correct preparation and a quality coating. Paint may show edge chips sooner, while stain is simpler to touch up.
